Events
Events are key to engaging your members. Popular on Rubric are balls, parties, cruises, dinners, and pub crawls. What’s your go-to event?
Creating an event
Log in to your Rubric account, click on the Sell tab and then on Ticketing. Click on the Create New Event button to get started.
Step 1: Event details
Event Name: Make it unique. Tip: Include the date for recurring events.
Event Date & Time: When is your event happening?
Event Banner: Add a banner (PNG, JPEG, or GIF, 930px width) with key details.
Event Address: Specify online or in-person location.
Event Description: Briefly describe your event. Theme? Dress code?
Facebook URL: Link it if you have a Facebook event.
Refund Policy: Choose from several options like case-by-case or no refunds.
- Terms & Conditions
Step 2: Setting up tickets
General ticket settings
This section is generic to your whole event. If you’d like to modify the details of a specific ticket type, head to the section below.
When do you want to start selling: Define when tickets go on sale.
When do you want to stop selling: Define when sales end.
Total number of tickets for event: Set a limit to your event if it has a maximum capacity.
Maximum tickets per order: Limit how many tickets one attendee can buy. This helps prevent scalping (default is 10 tickets per order).
Ticket fees: Decide if you’ll pass the fees onto buyers or absorb them.
Does your event have tables or groups: If your event, like a ball, includes grouped seating (tables, teams, etc.), you can organize attendees accordingly. They’ll select their seats or groups when buying tickets. Here’s how to set it up:
Type of group: Choose how to group attendees (by tables, teams, buses, cabins, etc.).
Number of groups: Decide how many groups you’ll have (e.g., 10 tables).
Number of tickets per group: Set how many attendees can join each group (e.g., 8 seats per table).
Create tickets
Click on Add Ticket to get started with the creation of tickets. You can create as many ticket types as you want.
Ticket name: Assign a name. Popular types include member/non-member tickets and multiple release tickets (Early Bird, Second Release, etc.).
Available ticket quantity: Set the number of tickets available for this type if any.
Ticket price: Assign a price. For free tickets, set it to 0.
Allow only club members to buy this ticket: Restrict tickets to your members if needed.
Allow custom start/stop time for this ticket type: For different ticket releases, set specific sales start and end times.
Advanced ticket settings
Set a password to purchase this: Add a password for exclusive ticket types.
Enforce minimum order quantity for this ticket type: Ideal for ticket bundles or packages (i.e. buy 4 tickets get 1 free, or buy 2 tickets for the price of 1)
Collect extra information from buyers: Add questions to collect necessary information from your attendees. Make them optional or mandatory as required.
Step 3: Summary
Review all the details in the summary, then either publish your event or save it as a draft. Once published, your event is live.
Creating collaborative events
Rubric enables you to co-create and manage events with clubs and student unions, whether they’re within your university or at different institutions. This collaboration allows for shared event management, ticket handling, attendee communication, and joint promotion.
Event access permission for hosts & collaborators
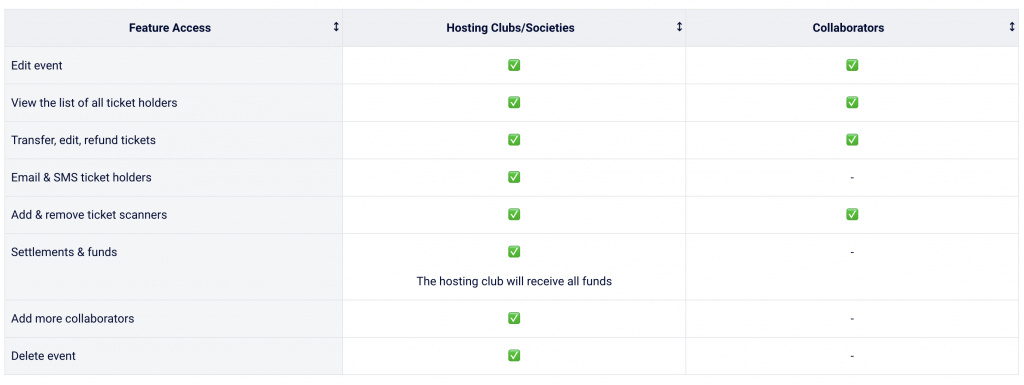
For event hosts
- Initiating collaboration:
- Navigate to Events > Create New Event > Select Create Collaborative Event.
- Create your event as usual.
- Upon saving as a draft or publishing, choose Add Collaborators.
- Enter the names of partner clubs/unions, generate a unique link, and share it with them.
- Once they accept, both parties can co-manage the event.
- The event appears under Recently Updated Events and Collaborative Events (if accepted).
- Managing collaborators:
Only the event host can manage collaborators.- Access this via Collaborative Events > Manage Events > Add/Edit Collaborators.
- Here, add new collaborators, delete existing ones, or generate new invitation links.
For collaborators
- Joining a collaborative event
- Use the invitation link provided by the event host.
- Sign in to Rubric.
- Accept the invitation to start co-managing the event.
- Access the event via the Collaborative Events section on the Events homepage.
- Enabling ticket validation
- Under the event’s Ticketing > Ticket Types, check for member-only ticket types.
- Edit the ticket type to select specific memberships for validation.
- If no member-only ticket type exists, create one and select memberships for validation.
Selling tickets for an event
Once your event is live on Rubric, it’s time to get the word out and sell those tickets!
Promoting your event
To maximize attendance and engagement:
- Email campaigns: Notify your members with an email blast. Use our user-friendly templates to create a campaign quickly.
- Social media sharing: Share your link-in-bio or QR code on platforms like Facebook, Instagram, LinkedIn, etc.
- Link-in-bio: All your events, memberships, and merchandise appear automatically on your link-in-bio – an easy way to keep everything accessible in one spot.
- QR Code: Generate and download a QR code from your event’s menu on Rubric.
Find all these promotional tools under Manage Event on the Events homepage.
In-person ticket sales
- Sell tickets on the spot: Use the Sell cash ticket option under the event menu. Attendees fill in their details and receive a text with steps to access their tickets via their Rubric account.
Managing the waiting list
If tickets sell out and you’ve set a maximum capacity, a waiting list will automatically appear on your event page.
Find the list under the event menu. Choose to take no action, offer tickets to individuals on the list, or reach out to them via SMS or email.
Managing attendee's and their tickets
Need to process a refund, update ticket details, or view your attendee list? Here’s how to do it.
Viewing attendee list
In your Rubric account, go to Events, select your event, and click View Purchases for a complete list of attendees.
Use the search function for specific attendees or sort the list for easier navigation.
Editing ticket details & processing refunds
- Editing tickets: Click Edit beside a ticket in the attendee list to:
- Modify dietary requirements.
- Transfer tickets or change name (update with the new attendee’s name and phone number).
- Update seating preferences.
- Refund or cancel tickets.
- Refunds: Any refunded amount is returned to the original payment card within 10 business days. For mass refunds, email Rubric Support with a list of ticket IDs.
Scanning tickets at your event
On the day of your event, skip the line by using the in-app ticket scanner!
Setting up
- Find your event under the Events page of your Rubric account.
- Hit the three dots on your event’s block and choose Ticket Scanners.
- Add names and phone numbers of your designated ticket scanners.
- Scanners will get a text with a link to the Rubric App.
Scanning tickets
- Open the Rubric App via the link, or download it if needed.
- Head to the ticket scanner feature, symbolized by a camera icon.
- Use your phone camera to scan QR codes on tickets. Optionally, manually select and mark tickets as scanned. The app notifies if a ticket has already been scanned.